
Not nails related…and yet, I wager you will enjoy this. PIC HEAVY!!!!
Glitter…bling…pink, girly sparkles…totally me. And in the process of starting my line of polish, I began collecting pieces of furniture that I hope to one day use in an office dedicated to Wicked Polish. So when I saw a pin on Pinterest of THIS table, I realized that pinning it was not enough. I needed to make this glorious table for myself. Immediately.
I did a bit of research Saturday night/Sunday morning (3am is a great hour for me, as it turns out). I found THIS blogpost and realized that I would have to spend a bit of money on the resin/epoxy/whatever mixture I would need, and had no desire to wait after ordering, so I went to Home Depot and found this little gem for $24.95.

I originally bought one, then went back for two more, then went back for two more for a “topcoat” this morning. So this particular project wasn’t cheap, but I am way too proud to care. I am sure I could have found the product online for less money, but frankly this is the weekend I had free, and I am the LEAST patient person ever.
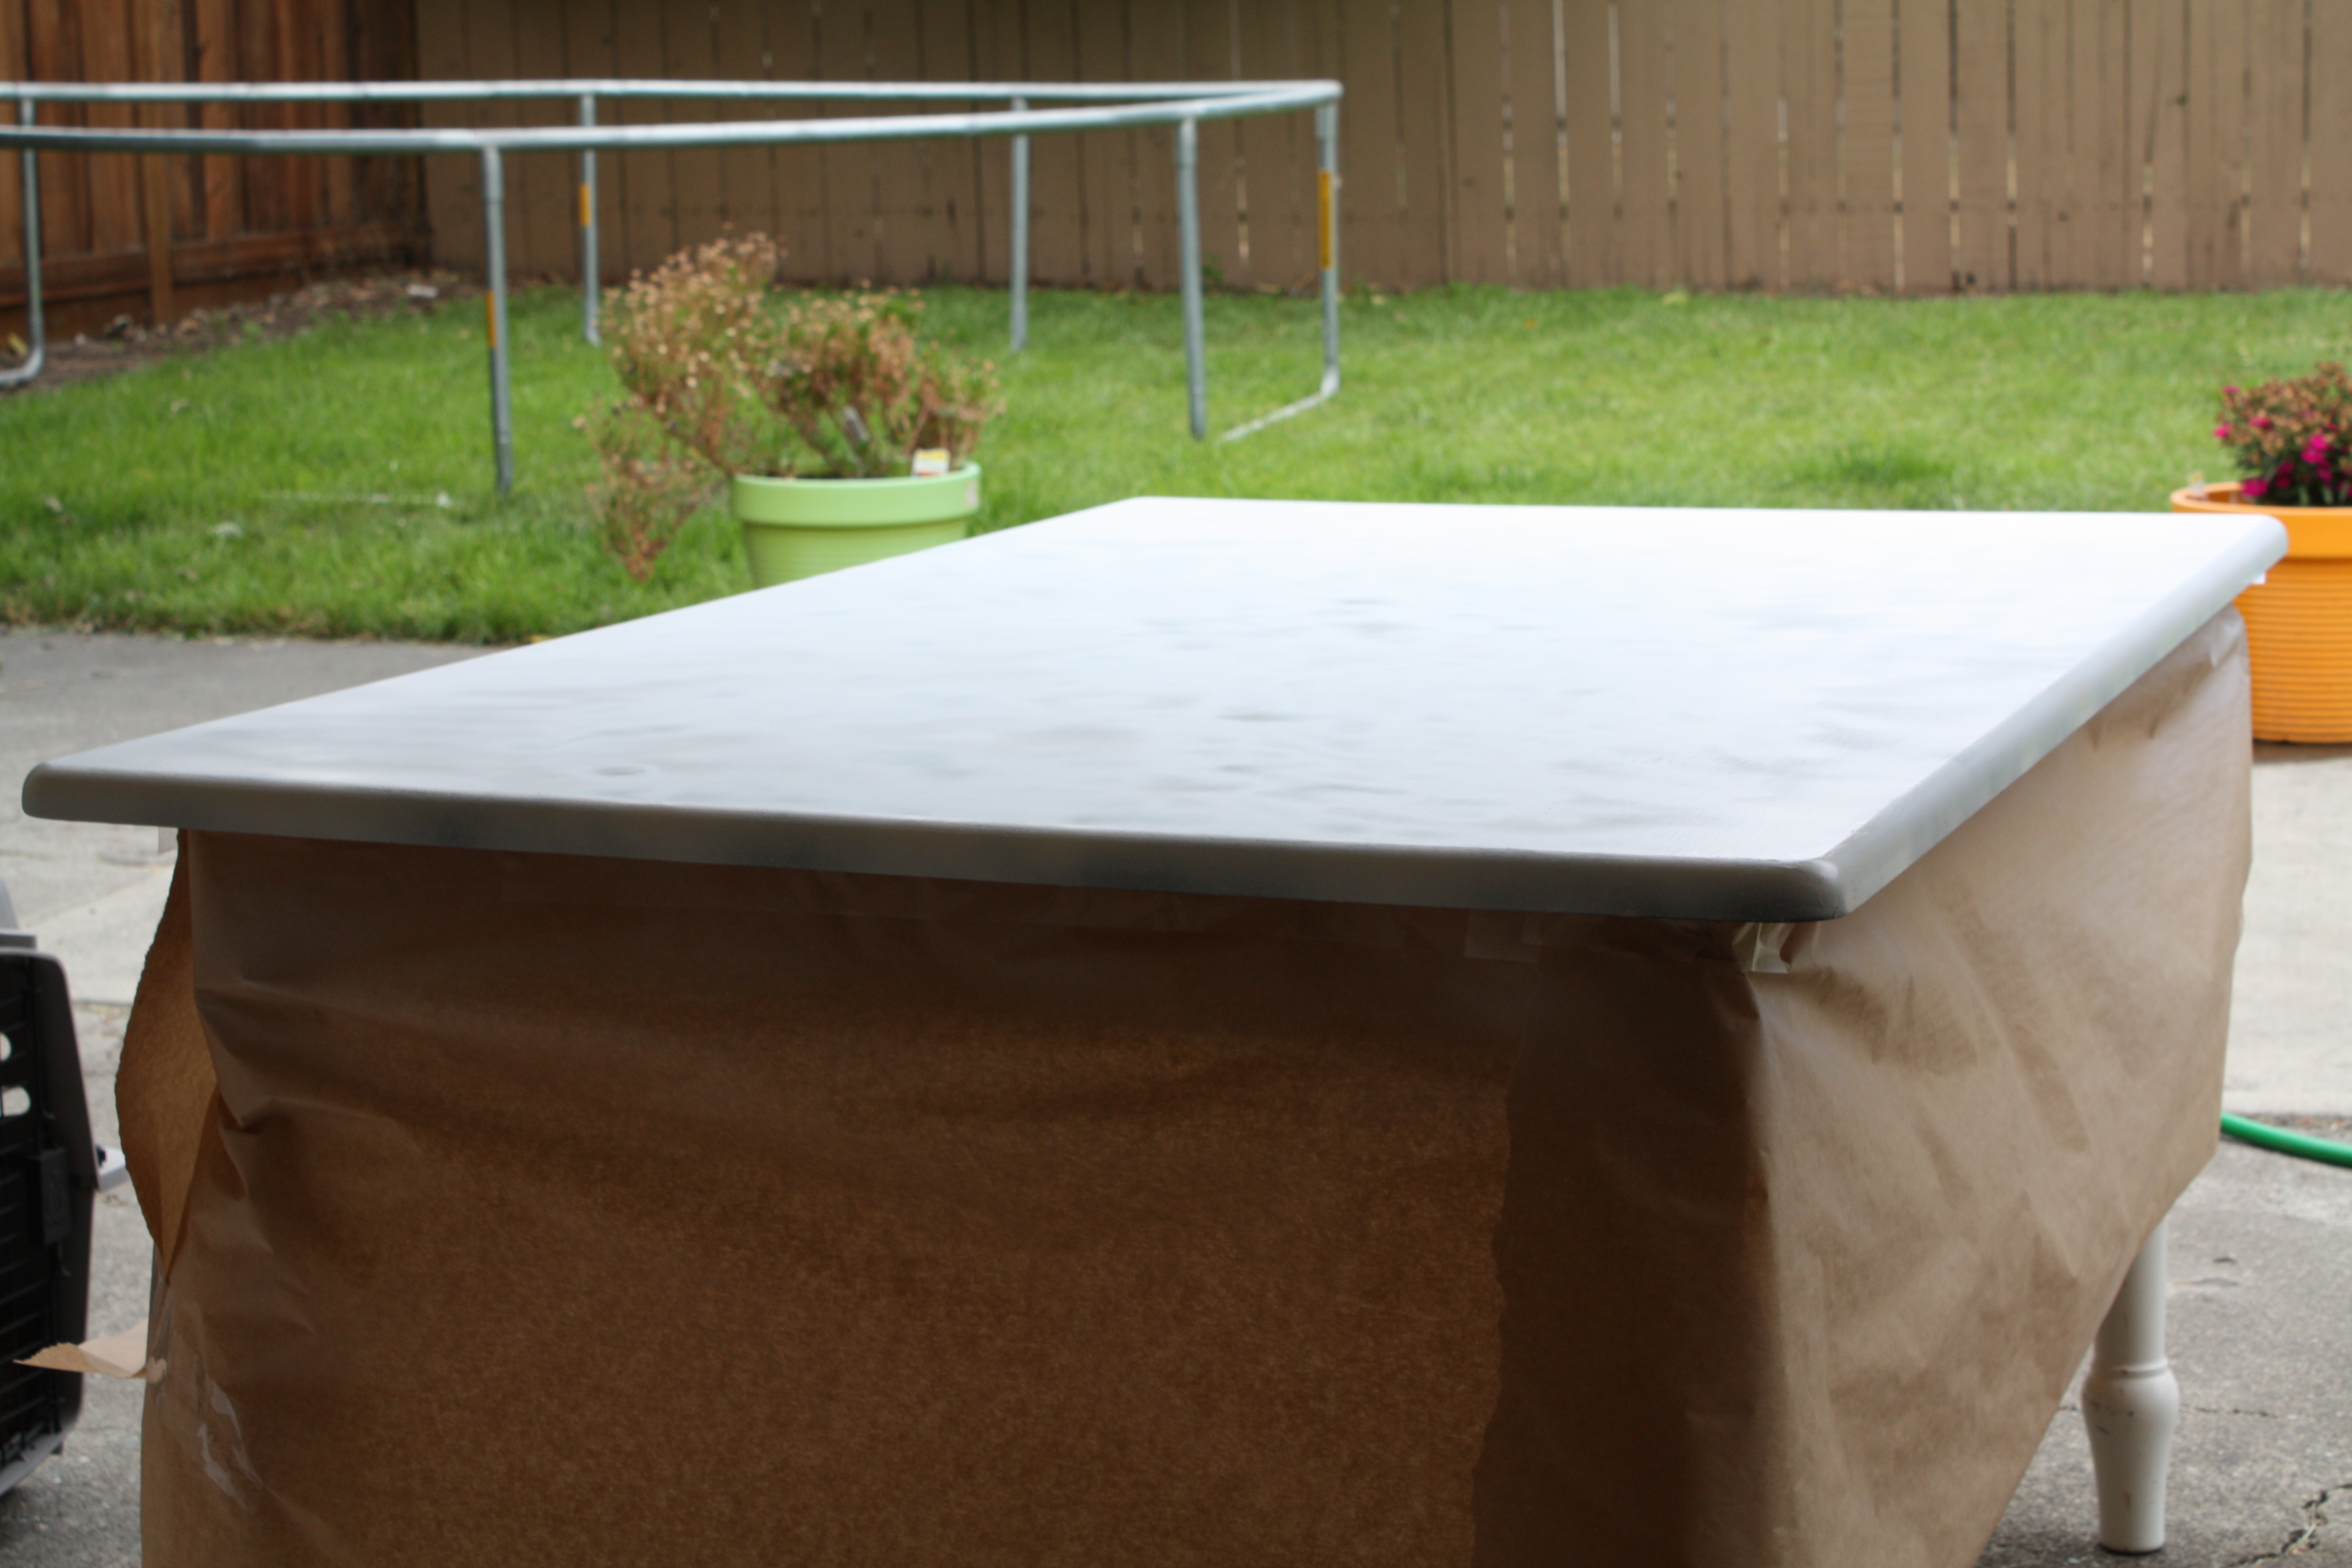
Here is my table…I painted it black and shiny about 4 years ago on a whim and loved it.

Sorry for the mess, we are in the process of closing the sale of our home (soon?) and moving. Plus, it always looks like this. Hah.

I’ve been making polish directly on this table for a while with the intention of refinishing it, so it has base and glitter and watermarks oh my!
 I hauled it outside thanks to a wonderful friend who came over in the middle of her day when I realized I was alone…and sanded it down. I think my sandpaper was 150 grit, it was whatever looked tough enough to cut through the shiny finish on the table.
 It got super windy and started to sprinkle (of COURSE), so I papered off the legs of the table. Probably the smartest last minute decision I made all day.

Never inhale crap. And be sure to take your ID with you to buy spraypaint. I got distracted and nearly bought neon pink, orange, yellow, and green spray paint. I don’t know what I would do with it, but keep it around long enough and I would think of something!
 I decided to use white primer because I don’t like grey. I also figured I would be able to see more easily where I still needed paint.

I used glitter that I have for making polish that didn’t pass the curl test – frankly, I don’t mind telling you I got it from Glitties, because it curls so badly you won’t want to use their glitter for nail polish making. You’re welcome. I mixed in some other sizes and colors of glitter I have lying around (and trust me, I have LOTS).

I sprayed the table pink…
 …and poured on this whole container of glitter, carefully covering the entire space. I used pink paint so that any bare spots would be less noticeable.

I liked it really well just like this – it has a sort of velour look. I realized immediately that the paint hadn’t been sticky enough, and my glitter was blowing around in the wind. I was highly annoyed, but had read someone had used Mod Podge to get their glitter to stay before applying the epoxy.
Don’t. Do. It.
I didn’t take pictures of this part because I was SO angry with myself and absolutely certain the whole project would be a huge waste of money. The Mod Podge didn’t cover the table and left ridges where it refused to spread. The glitter balled up and stuck to itself but not the table. UGH.

My lumps. My lovely glitter lumps. Check ’em out.
I show you this to prove that this epoxy is amazing and will straighten up any stupid things you do. Try not to test that statement, though; even Jesus doesn’t like to be tested.

I took the epoxy out and read the directions about 27 times. I had cups to measure it out, stirring sticks, and foam brushes. Oh, and a dog who distracted me. Look.

So I measure the resin and additive carefully and followed the directions, mixing slowly to avoid air bubbles. I poured on the first package (approx 1 quart, I ended up using 5 total)

It doesn’t look good, but the process itself was easy. As I spread the epoxy around, glitter picked up on the brush, but I never struggled with any bald spots. The instructions state to blow on the surface as you go to get rid of bubbles, as the epoxy will even itself out that way. It does work, but I didn’t have a thick enough layer so I just ignored that for the first coat.

I did bring the table back inside for this part, as you can see. The epoxy actually does not have an insanely strong smell, and between the wind and the rain, I knew there was NO chance of getting a high gloss, perfect shine if I left the table outside. Be sure to cover your floor so the people buying your house don’t have a pink sparkly floor 🙂
 These aren’t actually bubbles. This is chunky glitter balls, thanks to my Mod Podge experiment. But never fear. Mr. WickedNails had the amazing idea to sand them down before my second and final coat of epoxy. Brilliant!

I applied my final coat approximately 20 hours after the first coat went on, and I am thrilled with the results!

I picked a tough table to epoxy, as the sides are rounded. I struggled with drips the entire time, and the sides lack a thick coat of glitter, but a quick sanding of the epoxy icicles and I will be a happy camper!

I seriously love this so much. I want to take it back outside so you can have a sunlight pic…but seriously, I’m alone again and it is raining. So…eventually I will update this with a sun pic!

I hope you enjoyed this stray from the norm. I would love for you to send me links to any projects you have tried, or want to attempt!

❤ Rylee

This is the Ultimate Nail Polish Table (caps are needed). Pure awesome-ness. I applaud you!
Now I need to find a table laying around to glitter…
I absolutely loved seeing the pics and the step by step instructions! ❤
omgosh that is beautiful!!!!!!
omg i love this!!!! this is something i would LOVE to do because i just love crafty furniture refinishing, but there is no way i would stay sane with that amount of allowable screw ups…id make THEM ALL! it looks fantastic!
OH MY GOODNESS. ❤
Oh my gosh, this is amazing! I definitely will try this out in the future.
Holy Jeebus!! Just… WOW! Great project!
Ohhhhh *-* This is wonderful, a great job!!!!
I loooove it… the colour and the glitters!
You’ve used the Mod Podge, I know it… it smells so strange ehehe 🙂
xoxo
Excuse me while I phone my sick husband and tell him he should prepare this for me by the time I get home. lol Amazing Rylee!!!!
That looks amazing! You must have a lot of patience! Great job, well done 🙂
Hi. I used this post to convince my mom to finally let me glitter this one table we have.
I love your table, it is amazing.
YAY!!!!! That is awesome! Your mom clearly rocks. I hope to see pics! Send a link if you post it!
Will this still work on a vanity table that is pressed wood?
Sorry, I didnt really understand if you did or didnt think the Mod Pog was a good idea…. Should I try the Mod Pog?
I would skip the mod podge!! And I don’t know how pressed wood would react, although the epoxy should even itself out even if the pressed wood bubbled or warped…let me know if you try!
Holy crap!! I neeeeeeeddd to try this! It is amaaaazing!! <3<3
Gah!!! OMG I have to try this…..I neeeeeeeed a glitter table. ❤ ❤ ❤ ❤ It's so pretty and sparkly and PINK! ^_^
I was in the process of trying to do the same thing-in a different color, although the pink is spectacular!!!! And I had a few of the same issues with clumpy glitter, so I have hope now that my finished product will look as great as yours does!!! I couldn’t find other glitter tables on pinterest like what you and I are doing-yay!!! Anyways, great job!!! I appreciate the pointers!
Oh awesome, thank you! Cannot wait to…glitter more things. Such an addiction!!!
Do you think this will work on my manicure table? I soooooo want to try it now!
The only reason it wouldn’t work would probably be if the edges are round (like mine, whoops) or if you didn’t sand it some first so everything sticks and doesn’t easily peel off. Let me know if you do it, I wanna see!!
Rylee, I love your table!! Also thank you for the steps and tips and the photo of a distraction lol it means alot that you post lots of good pictures throughout the entire project! 🙂 your table is gorgeous thank you so much for sharing and cute dog!! 😉
This is awesome and i now want to do this to my table, its so drap and boring. I am inspired, thank you x
Gorgeous table! Your hard work has really paid off 🙂
I just happened to be given an old dresser when i came across this. I am real excited to see how it turns out. Will be sure to post pictures of finished project. Thank you for sharing!
Like this table idea. Great instructions and info. Thanks.
This is so cool! I would love this in black and Silver…oooohh! do you think a thin coat of epoxy would have done the trick to get the glitter to stick? So skip the hodge podge step? really great job, your awsome!
Yeah, I think I mentioned I would skip the mod podge. It caused the glitter to look cloudy. But no, it required a lot of epoxy to even out the glitter. Without a second coat it would have been visibly lumpy and snagged on clothing, etc.
LOVE THIS!!! I glitterized my helmers and made my own makeup table, but now I think they need more glitter! If you want to check them out I posted about the process- http://www.thepolishedmommy.com/2013/07/my-new-and-improved-battlestation.html
Maybe someday I’ll glitterfy my nail desk, you can never have to much glitter lol.
What a fun DIY, It came out really nice. 🙂
I love this so much! I have the perfect piece of furniture for this!
Do you think adding the glitter to the first layer of epoxy before spreading it on the table would fix the clumping issues?
You’ve inspired me to no end. You ROCK. I would have bought a house with pink glitter on the ground, by the way.
Hahahaha thanks!!! I think it added character 😉
Love this table!! You did a wonderful job! I am going to try this on a few items in my dressing room using silver glitter. I’ve looked on the glitties website, but the biggest container of glitter I see is the 10 gram jar. How big was your jar of glitter? Thanks!
Huge. I probably used more than necessary but I wanted depth. I used at least 2 16 oz jars full…and then added some big glitter from another jar.
thank you! this was the response i was looking for.. I just got 2 – 10oz of mandarin, 1 10oz of tangerine and 1 oz of crush!!!
Do you think you can use any type of glitter? Or should it be a fine glitter? Your thoughts?
You could use any type! Just keep in mind that using some variation will give it more depth, and holographic glitter looks the coolest 🙂 Some iridescent glitter might quickly react with the epoxy and look muddy, for the same reason most iridescent glitter doesn’t hold up to the chemicals in nail polish.
Correct me if I am wrong here but, couldn’t you just spray the table with spray adhesive before sprinkling on the glitter?? The spray glue meant for mounting photographs in particular is very slow drying and often remains slightly tacky for a long time. Unlike mod podge you could probably even go back and add multiple thin layers of glitter without worrying about it clumping. You might even be able to get glitter to stick to the edges of the table as well! Good project idea!
I’m sure that would have worked. I was following something on Pinterest. Now that I’ve done it several times, I’ve figured out what works the best for my glitter and epoxy. The epoxy I use is so thick, you don’t even need the glitter to be held down on the table. I just didn’t realize the first try!
Looks amazing! How does the epoxy stand up to acetone ? Thinking of doing a manicure/nail table 🙂
Thanks! The stuff I used holds up okay, I think with tons of exposure it might make the surface look cloudy. It would be perfect for that though! My husband builds models and he’s using the black/blue/silver table I did. Seems to hold up great!
Hello I did a simp!e version for my daughters desk…I used the tacky spray and tons of glitter her deskl already had a glass top to it so I didn’t have to worry about it coming of and it looks really nice ..Similar to yours..Thanks for the idea..She loves it
Oh awesome!!! I want to glitter more things, it’s so much fun huh!
I want to glitterize some furniture… i will stary off small any help on were to start would be amazing xxxx
[…] that was on my level. Some were either too detailed, I do not have the patience or budget to shellac my dresser, or there were videos I found that had “Glitter Furniture” in the title of […]
Looks awesome. I’m trying this on a Minecraft-ish desk for my daughter. I used the spray adhesive, and it works really well. I’m about to spread my epoxy on, but I’m worried about the rounded edge and the epoxy dragging the glitter down with it as it goes over the edge. Did you have that problem? What grit sandpaper did you use to sand it, and afterwards, did you have to reapply the epoxy to the sanded areas?
I since did a second table (uh…and third…) and I did NOT sand them down. I simply applied more epoxy to the bumpy areas and made sure to blow gently on it right after pouring to help any bubbles pop and the epoxy just slides right into place. Some glitter went over the edges and the sides of my table where the edge is round has a bare layer of glitter, but that’s fine because the paint underneath is pink and matches. The epoxy dripped for what felt like EVER but really, it did not take away from the effect or the amount of glitter in a noticeable way. Have fun! If you want to sand I would use a very light grit, you don’t need much…but for me there were a couple places the dust stayed and made little pockets under the epoxy. Anyway. Happy Minecrafting! Sounds way cool 🙂
I love this SO MUCH I AM GOING TO TRY!!! Last time I tried epoxy(Not on a table) it was supposed to take 24hrs to cure, 8 month later and it is still very very spongy. It’s cured but very non-glossy and springy whereas I wanted it to be hard and glossy like glass. What mix ratio did you use? SO JEALOUS!! xx
[…] Glitter Top Table by Wicked Nails […]
LOVE IT!
Do you think this would work out as a counterparts for a kitchen?
Looks great! I want to know how it’s held up I want to do it to a counter top. Will it hold up and still look good after a year?
My ONLY issue is that I left it in the sun and the glitter I chose faded somewhat! The part that wasn’t in the sun looks vibrant and gorgeous but that which was exposed (to DIRECT sunlight because I was lazy and didn’t realize) is faded. I would say if you do it on an indoor counter, just be aware of how much sun it gets and what you leave on top of it: you might have some darker areas after awhile. Other than that I think it held up really well! I still use this as a work desk and have zero issues with it! ❤
This is awesome! Exactly what I needed to know to finish my daughter’s vanity!!
[…] Chances are, you’ve already thought about painting your furniture with glitter, especially after seeing the paint options above. However, there’s an additional way to add some sparkle to tabletops – epoxy! Mandi at Making Nice in the Midwest wanted a durable top for a furniture piece that she was making over. She shares on her blog exactly how she did, so you can replicate it in your own project. Looking for another example? Check out this pink glitter table. […]
[…] Chances are, you’ve already thought about painting your furniture with glitter, especially after seeing the paint options above. However, there’s an additional way to add some sparkle to tabletops – epoxy! Mandi at Making Nice in the Midwest wanted a durable top for a furniture piece that she was making over. She shares on her blog exactly how she did, so you can replicate it in your own project. Looking for another example? Check out this pink glitter table. […]
You saved me from a fate of glittery chunks because I decided to be safe and check your blog. Thank you!!
Hahahaa I am so glad! I hope your project turns out great! I want to do another one (actually I want to redo this table; she sat outside when we moved and faded a bit!)
Beautiful table btw but my question is instead of hodge podge just use the epoxy ?? I want to do the top of a old vanity I’m fixinging up.
Yes, I think I mentioned that I would NEVER use the mod-podge again. Skip it!
What color glitter is that and where did you get it? ^-^ wanting to know so I can buy the same exact glitter love that color.
Unfortunately it’s a mixture of lots of glitter I had tested out for making nail polish – these were just glitters that bled or curled and didn’t make the cut! I know some are from a shop online called Glitties.
I thought I researched vigorously regarding glitter table and sadly I didn’t, with that being sad I do not love the outcome of my mod-podge glitter table and it is sitting inside my garage, luckily I just read your post and want to be crystal clear before proceeding forward on what items I need so that I can love my table. I know this post is 5yrs old but hopefully you will respond. Can you advise if all I need is the Parks Super Glaze pour-on?
I didn’t take a picture of the glitter but I did take one after I spray painted it gold.
Best Regards,
Raeneice
Hi Raeneice! I definitely get it – that’s so much work and then to not like it sucks! I think adding the epoxy glaze will help. It took my table from clumpy and gross to clear and shiny. Having made this mistake myself, I THINK yours will improve too, but I can’t honestly say that for sure. If you’re unhappy with it in its current state, it’s probably worth it to try (I know epoxy is pricey ><) Let me know if you go for it!!!
So my question is all I need to buy is the Parks Super Glaze product? or do I need that and something else… I will be sure to send photos.
What size glitter did you use? I love this table and am going to attempt to recreate it!!
This is a mix of .04 to .094 (1-3mm) hexagonal glitters!
Do you have to use epoxy or can you get the same result with polyurethane? Thanks